Shopping Cart
*continental US addresses only


Today I’m going to talk about how to adjust a weaving pattern to fit your loom. Resizing and adjusting a pattern to fit your loom’s width just takes a pencil, a bit of paper, and (if you’re like me) a calculator to help you successfully adapt the project.
As examples, I’m going to use the two projects I’ve designed for Gist (Tidal Towels & Squarish Rug), along with the Textured Cotton Scarf which was designed by Emma Rhodes. Regardless of whether you’re weaving on a rigid heddle or harness loom, I feel that adjusting a weaving pattern to fit your loom can be broken down into 3 steps: gathering project details, calculating shrinkage, and adjusting the pattern.
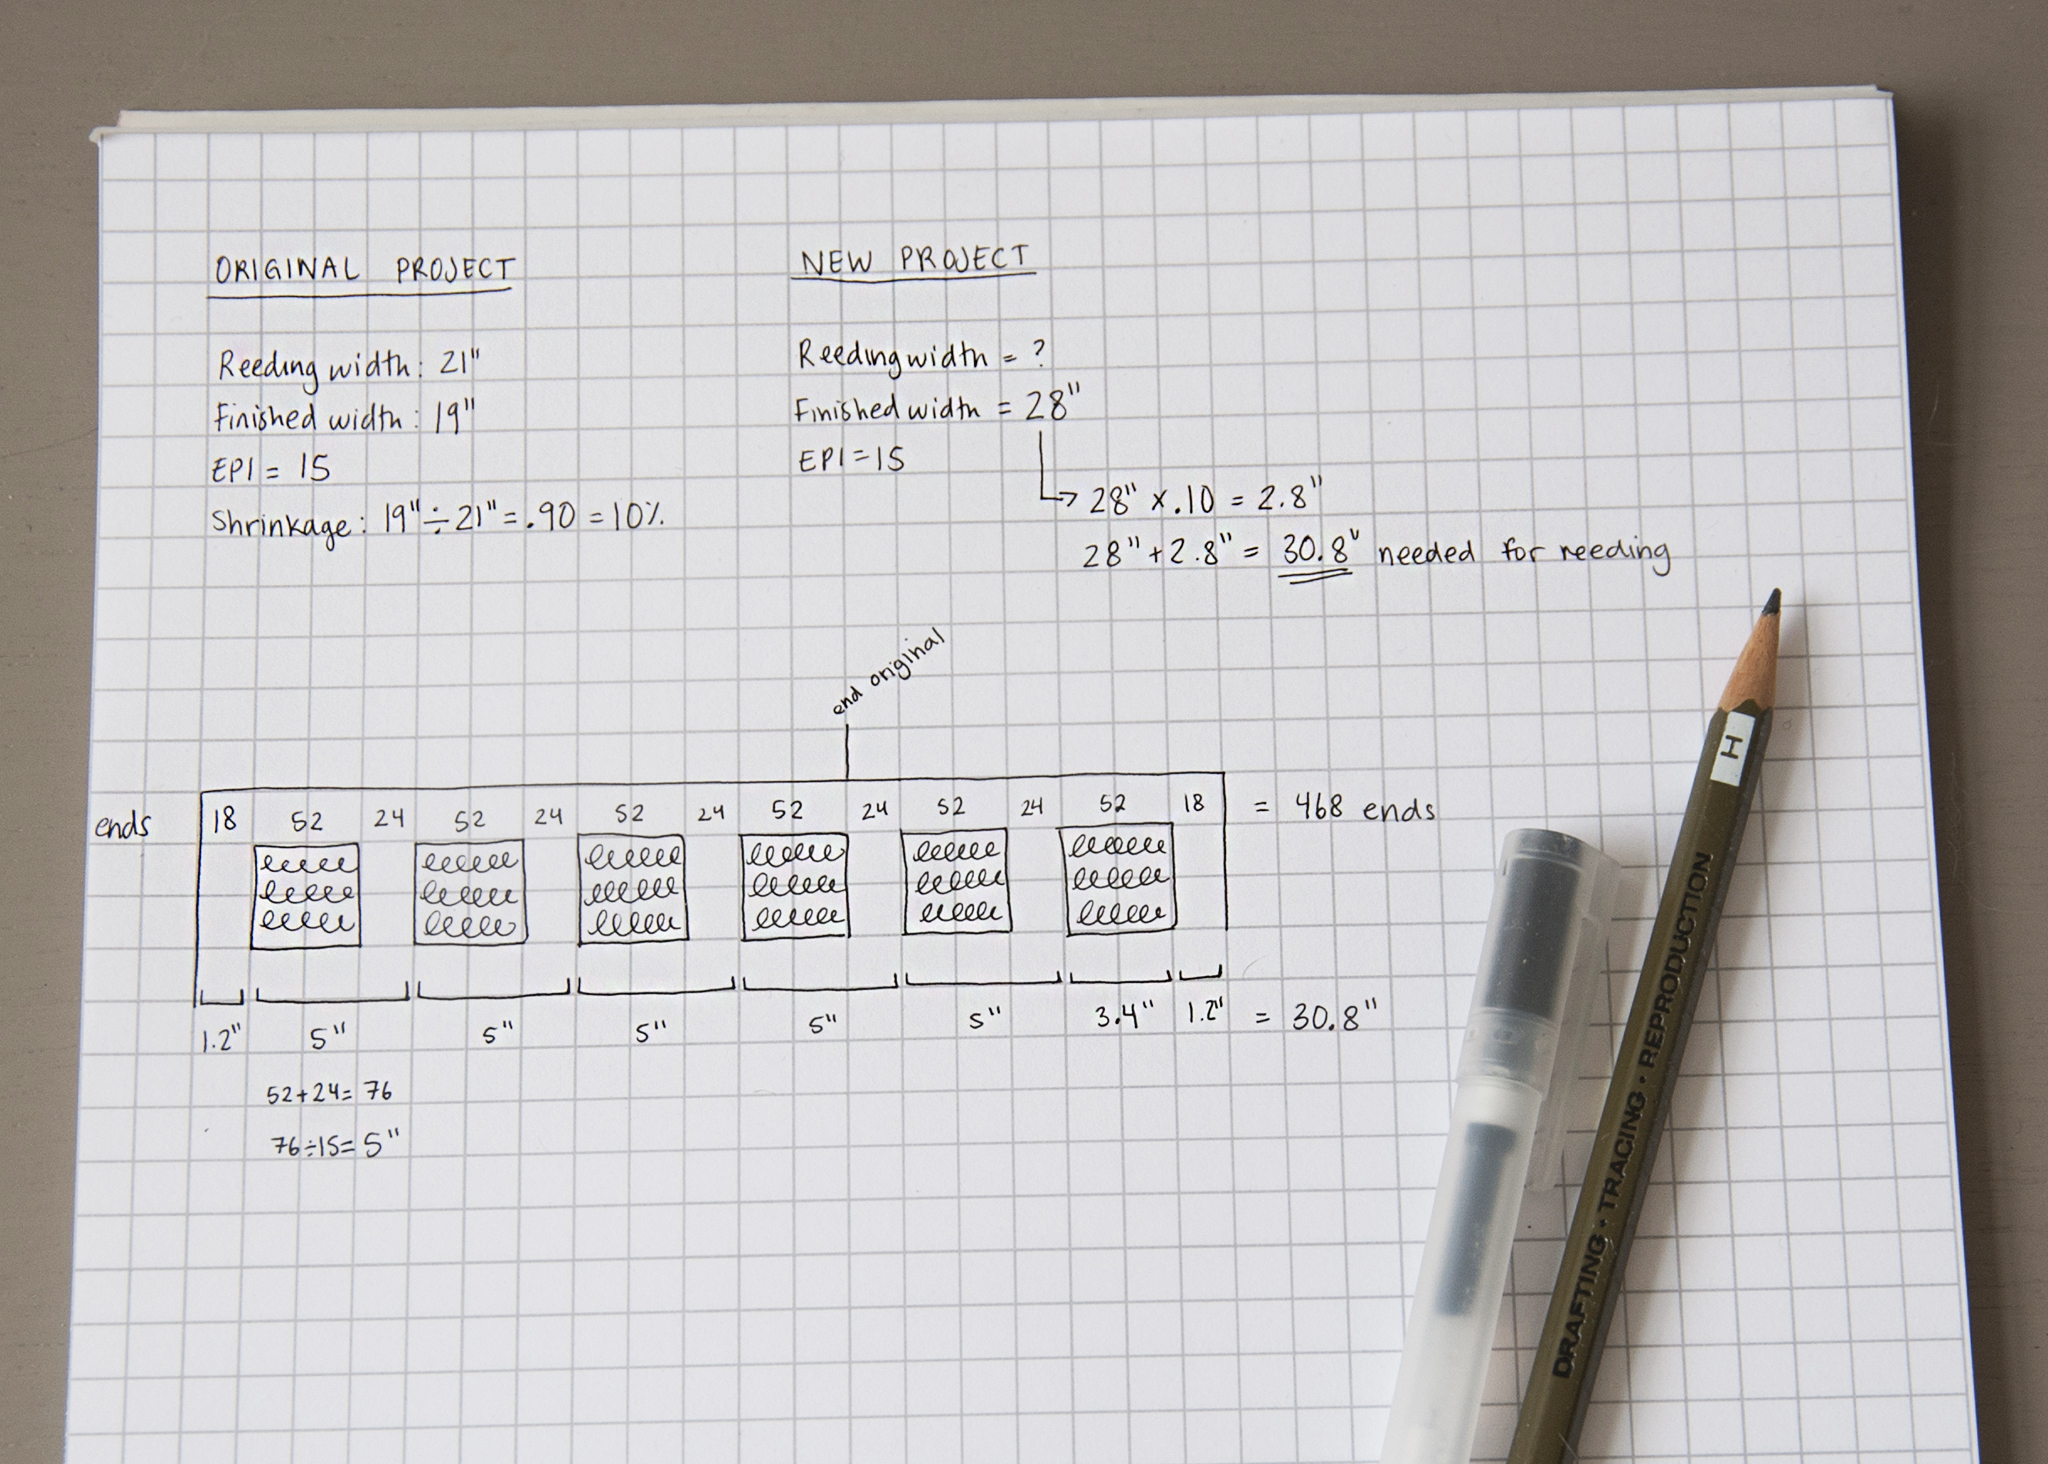
Let’s say you’d like to weave my Squarish Rug - it has a width at reed of 21”, but you’d like to make the rug a bit wider.
First you’ll need to collect some information about your original pattern: the width at reed, finished width, and EPI. Then decide what your new width is going to be.

I first use those numbers to find out what the percent that the project shrunk width-wise. To do this, divide the finished width by the width at reed:
That means the finished width is 90% the size of the reeding width - or that it shrunk 10%.
Armed with this information, I can now apply that shrinkage rate to to my new width (28”) to find out how many inches my new project will be in the reed.
Next, multiply the your new width at reed by the sett (15 epi) to determine the amount of warp ends.
This is the basic math that you need to adjust a plain weave pattern without more complex details such as stripes or other pattern blocks.
Now we have rough idea of how many ends we’ll need to get a finished width of 28” and we can move on to the next step - adjusting the pattern.
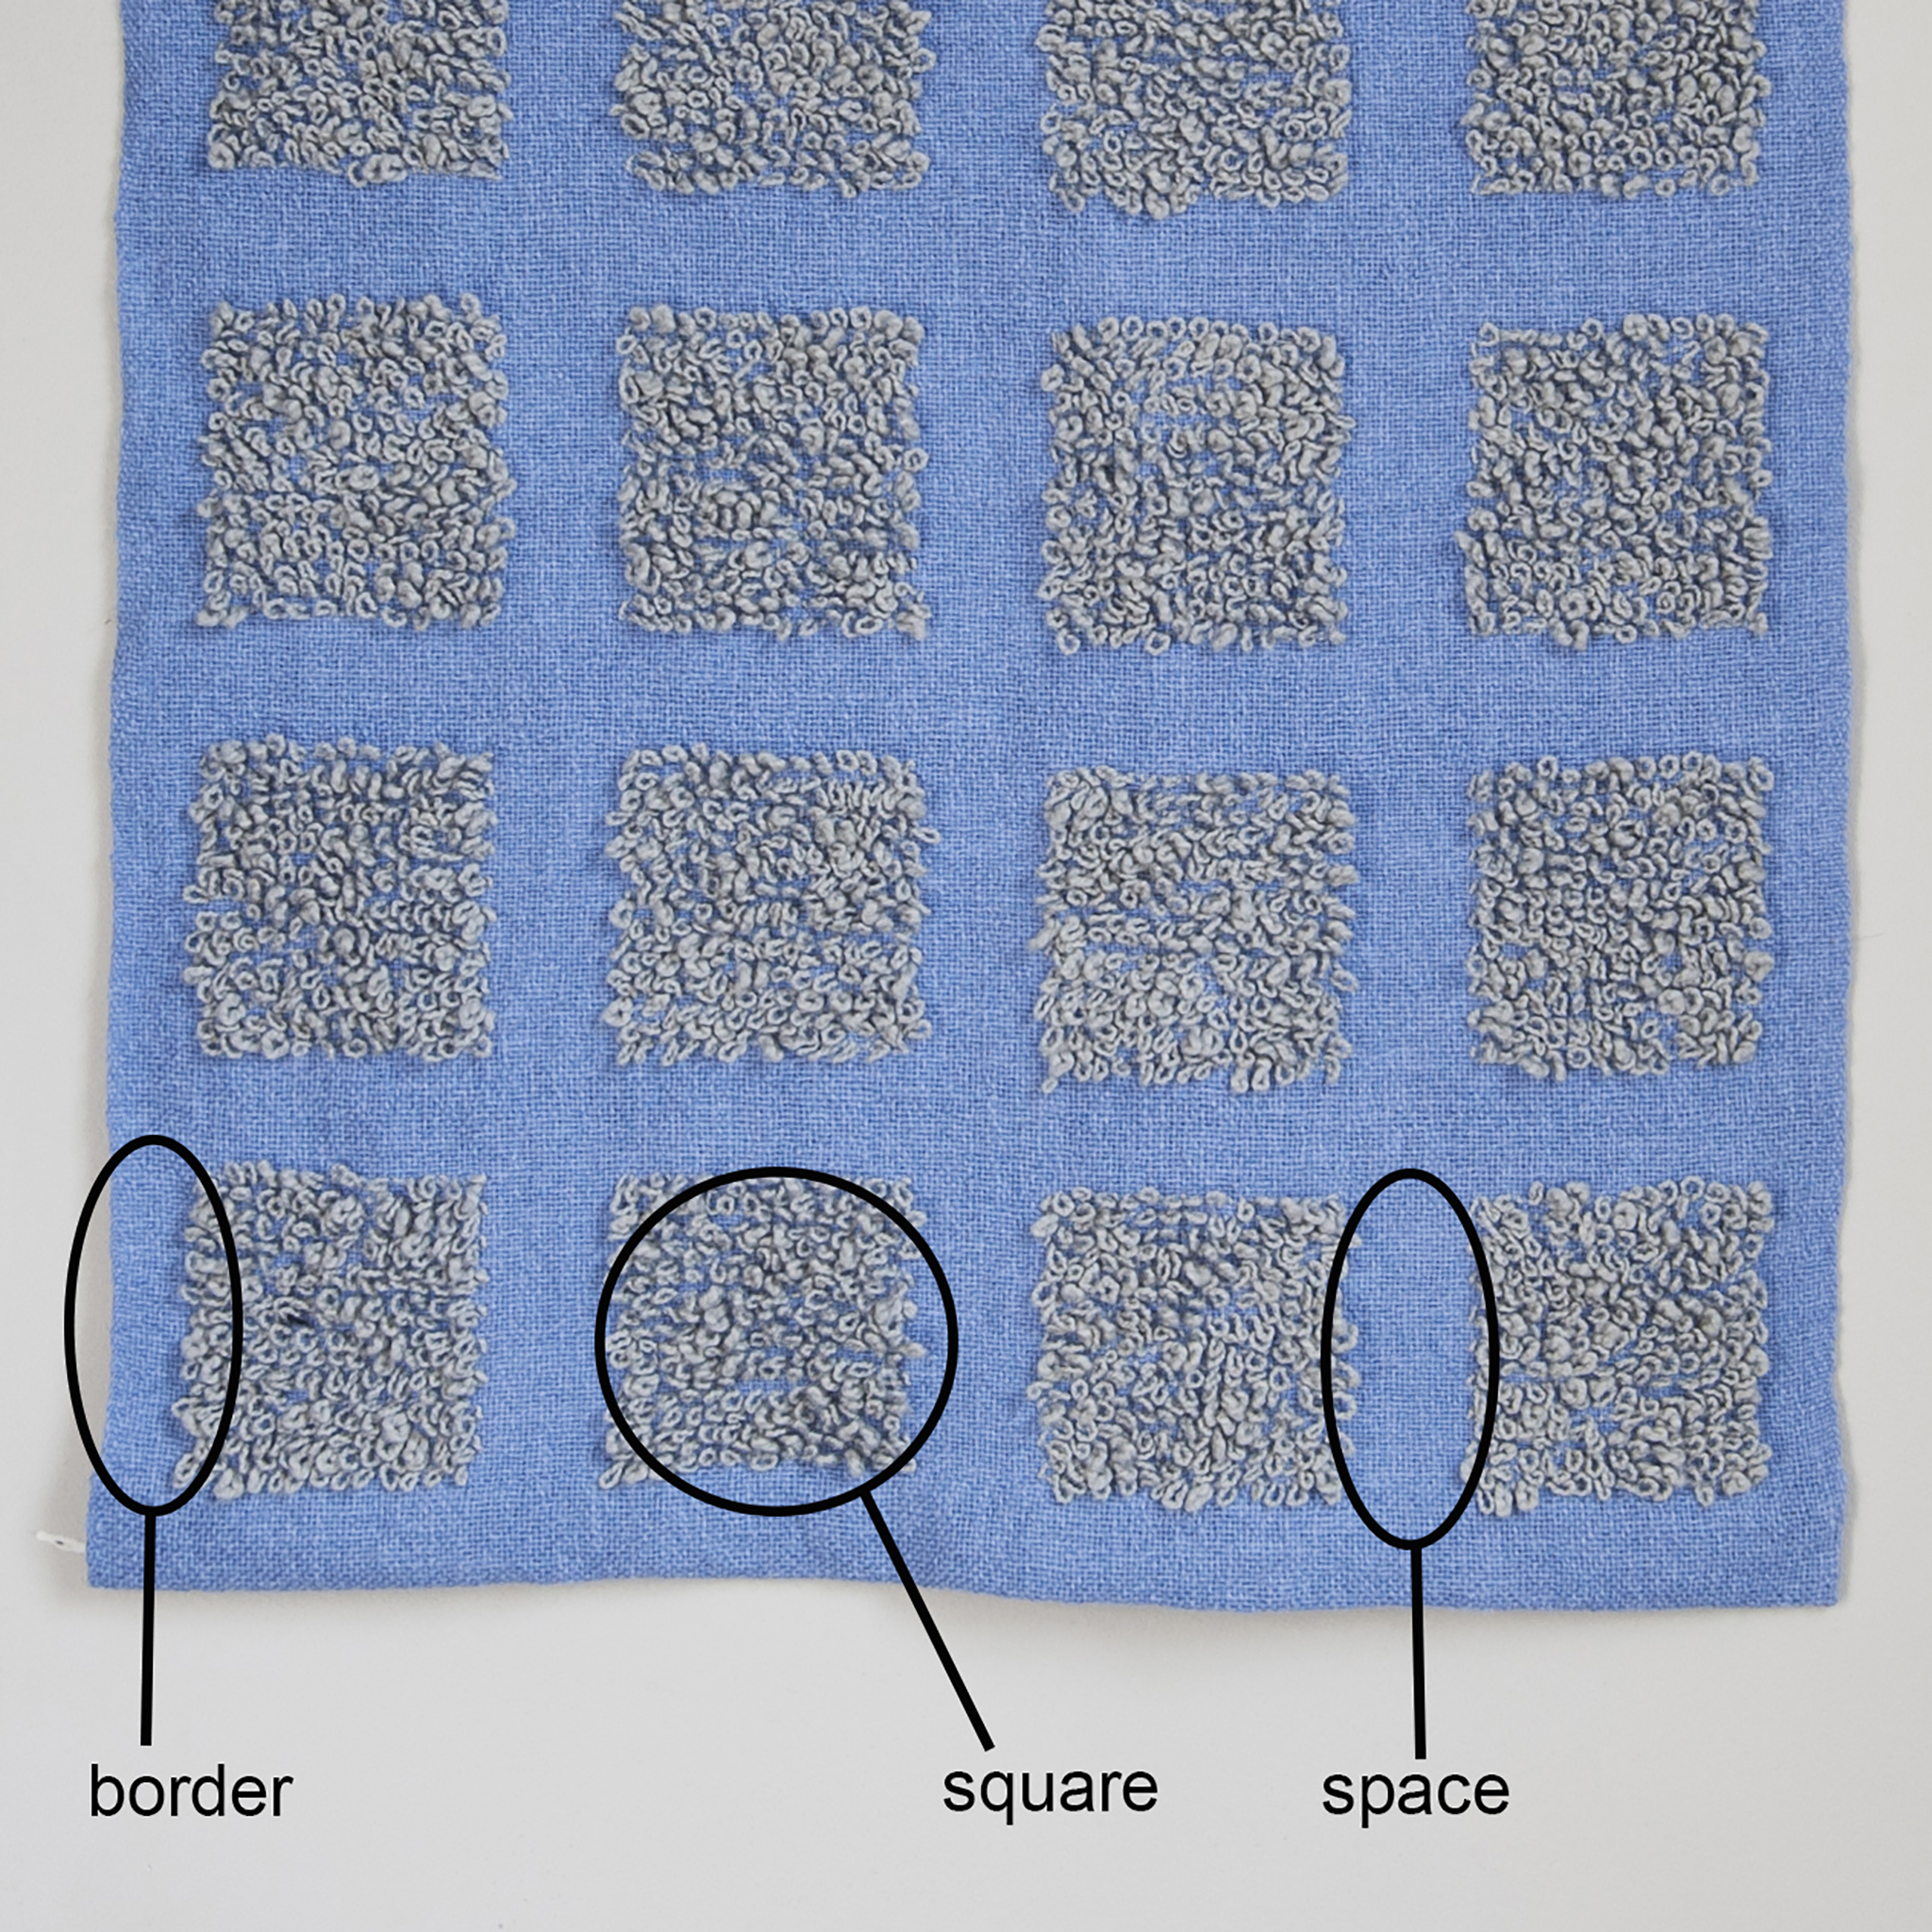
The Squarish Rug is woven in plain weave, so there’s not anything special I need to do to adjust the threading, but by examining the pattern, I can see that it’s made up of three different sections: a border, a square, and a space between those squares. (See photo above for reference). Each of those sections is made up of a certain number of ends, so the next thing I’ll do is figure out how many inches each section represents:
The original rug has 4 squares separated by 3 spacers, with 2 borders. Added together, each square/spacer combo equals 5”.
To adjust this pattern to fit my new width, I can add two squares (104 ends) and two spacers (48) to the pattern for a total of 152 ends, or 10.1”. As you can see on my drawing below, I write out each block and how many ends and inches it represents, and then I’ll add up all those numbers to figure out how many ends and inches the new project will be - 30.8” or 468 ends, pretty much exactly the amount I calculated earlier to get a finished size of 28”.
I was lucky there, but what if your pattern doesn’t divide as nicely? When adjusting weaving patterns to fit my loom, I usually treat my numbers as an average and aim for something in that range, give or take about an inch to either side (15 ends in this case). You can always add or subtract ends from the border, the square, or the space as well, not just the size of the project as a whole. The same math and theories work for making a pattern more narrow as well.
Let’s say you'd like to weave the Textured Cotton Scarf, which has a width at reed of 14”, but you need to make it narrower to fit your loom. The same math applies as when adjusting to make your pattern wider - first step, collect your information:
To figure out how many ends you need, simply multiple the ends-per-inch by your loom’s width weaving width:
You can also calculate the shrinkage if you’d like to know approximately how wide your finished scarf will be. First divide the finished width of the original scarf by the width at reed of the original scarf:
That means the finished width is 82% the size of the width at reed - a shrinkage rate of 18%.
Next, multiply your adjusted width at reed by this percentage (.18) to find out how many inches your scarf will shrink:
Then subtract 1.6" from your adjusted width at reed to approximate how wide your scarf will be:
Adjusting a four harness weaving pattern follows the same formula, but with a closer look at the way the pattern itself repeats. We’re going to look at my Tidal Towels as an example.
The Tidal Towels have a width at reed of 16.9” and a finished size of 15.5” - which is approximately 9% shrinkage (following the same formula used previously). They’re sett at 20 EPI.
I can see that the pattern is made up of 3 different sections:
If there’s a repeating pattern in a weave, I like to look for the beginning and end of the repeat - in the Tidal Towels, the repeat starts on harness 3 and ends on harness 4 - I’ve made a rectangular box around the repeat in the following image so that you can see it. This repeat is 22 ends long.

Lets take a closer look at that repeat. It has two parts to it - the first 11 ends create the downward wave, and are mostly on shafts 1 and 2, while the last 11 ends make the rising wave and are on 3 and 4. Across the width of the pattern, the complete wave is repeated 12 times and is balanced out by repeating the first 11 ends of the pattern (the downward wave).
A complete wave is 22 ends, which is almost exactly an inch - making it really easy to add or subtract to the width of the project. If I’m widening the towels, I could increase the number of times I do the wave repeat by adding 22 ends (or 1”) until I reach a size I like. I could also add or subtract ends from the border section - it’s plain twill, going either 1-2-3-4 or 4-3-2-1, so it would be easy to add or subtract ends. Because we know that this project is sett at 20 epi, we can figure out that 5 ends = 1/4”, making it easy to adjust the borders by small amounts.

Another way you can look at adjusting weaving patterns is by adjusting parts of the patterns themselves - in my Tidal Towels, for example, once you see how the pattern repeats, you could elongate or shorten the waves by adding ends in the middle of each wave - in the downwards wave by adding/subtracting two threads on shafts 2 and 1. This is where adjusting weaving patterns gets creative - you can quickly change the balance of a motif and end up with something entirely new. Keeping proportion in mind is key!
Another way to adjust a weaving pattern is by using different materials or setting it closer or farther apart. In the Squarish Rug, I offer suggestions in the pattern for changing the height of the loops by using a smaller knitting needle, but you could also try a different yarn or a blend of two or more threads. When you start adjusting patterns in this way, the formula can help - but only to a point. To get accurate adjustments, you’ll have to make samples and take measurements.
When it comes to weaving, there are very few set-in-stone rules - I feel that if you’re achieving results that you like using your method, then keep doing it that way! This way of figuring out how to adjust weaving patterns to fit your loom is the way I would do it - it suits the way I see and interpret patterns. I’m sure there are different ways to arrive at the same result though, so make samples, play with your weaving, and develop a process that works for you. Do you have a good method for adjusting weaving patterns? Let us know!
Amanda Rataj is an artist and weaver living and working in Hamilton, Ontario. She studied at the Ontario College of Art and Design University and has developed her contemporary craft practice through research-based projects, artist residencies, professional exhibitions, and lectures. Her textile focus of the material and conceptual nature of vernacular, everyday objects used for the home and body; her work (and weaving patterns) are available at her website, and at Guildworks, or by commission.