Shopping Cart
*continental US addresses only


A float is formed when the warp or weft skips over two or more warp ends. The floats we are discussing are the ones you didn't intend to make.
Floats happen. Over the years, I have come to rely on two primary methods to fix unwanted floats.
Ideally, these fixes are worked before you wet finish the fabric. But often you may not notice the floats until after you have already done so. If that happens, these solutions can still be be worked after washing or wet finishing. However, you may want to soak the cloth in water a second time to help incorporate the repairs into the original weaving.
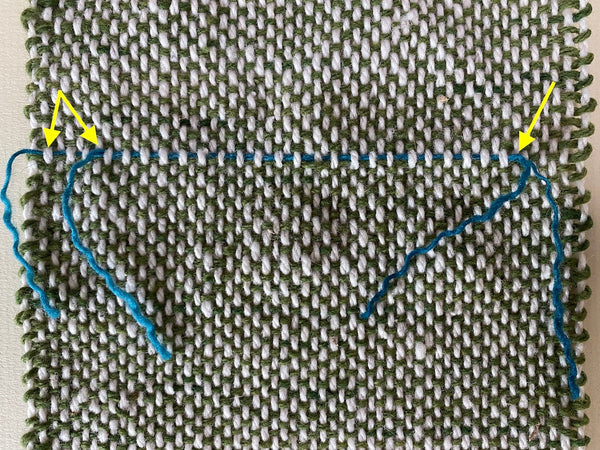
You may notice that the floats all seem to be along a single warp end. This can happen if the warp yarn is a little sticky, a single warp end is a little loose, the fabric closely sett, or in the case of double weave, you are working a layer of fabric where you can’t see it. This repair should be worked before you finish your fringe.

Unweave the yarn by gently pulling the warp yarn from the cloth using a large-eyed metal needle.

Using your blunt needle, weave the warp yarn back into the woven fabric traveling the correct pathway, thus magically removing the float.

The tension on the repaired warp end will be a little tighter than on the other yarns, but it will equalize when washed.

You can add in a place-keeping thread before you remove the yarn, by weaving in a contrasting-colored yarn along the correct pathway before you remove the warp yarn. This will give you a guide to follow when you are reweaving the warp yarn.
This process is relatively easy with plain weave and twill weave, which offer strong repetitive structure lines to follow. Other structures like lace can be a bit tricker. For those, I recommend a place-keeping thread. Even if the floats are in the middle of a long piece of cloth, this method works amazingly well.
Alternatively, you can fix a float by needle weaving in a supplemental yarn. This fix can be worked warp-wise or weft-wise. If you have a warp float on one side, then you will most likely have a weft float on the other, so you have choices in which direction you want to work the fix. Repair weft-wise for floats that are in the middle of the cloth, weaving in a supplementary weft yarn. Repair warp-wise for floats nearer the edge, needle weaving in a supplementary warp yarn. Shown here is a weft float repair using a contrasting yarn. You want to use the same yarn you used as weft.

Following the correct path the weft should have taken, needle weave in a supplemental weft yarn. Be generous with your length. If possible, needle weave in an extra 3-inches on either side of the float, stopping short of the edge by about an inch and leaving a generous tail on either side.

In the photo above, the supplemental yarn is traveling the path the weft should have taken (shown in a contrasting color). The arrow is pointing to the supplemental yarn. The float is just below it.
Depending on how thick your yarn is and if it is plied, you may want to untwist the tails and needle weave in one of the plies for an inch. This will help incorporate the tails into the woven cloth.
If your yarn has more than two plies, split them as evenly as possible. If your yarn is super fine, this step may not be necessary depending on how tightly spaced your yarn is. Denser, finer cloth traps tails better than open weaves in chunky yarns.
On the right is one of the tails untwisted to create two separate tails. On the left, one of these tails is needle woven back into the cloth.
Now comes the scary part, but be brave. Snip the float in half.

Depending on the density of your cloth and size of your yarn, you can choose to pull out a bit of the cut ends, split the plies, and weave one ply or plies back into the cloth. They will be too short to put on a needle. I use a crochet hook or similar object to pull the tail in and out of the cloth.

Above, the arrows point to the short weft tails created by unweaving the cut yarn, deconstructing it, and weaving half of it back into the fabric.
Don’t trim the tails until after you have washed and dried it. After this point, you can trim them flush with the fabric.

The supplemental yarn will be barely visible after the woven fabric has been washed, looking much like any other join you may have made in the fabric. (If you are interested in exploring joins including this ply-splitting method, I have a blog post for that.)
There is a third kind of float that you can fix using a supplementary yarn method. These floats are caused when you miss a step in the weaving sequence. Shown here is a 1/3 twill band on a ground of plain weave. One of the steps in the weaving sequence was missed. This isn’t as obvious on the face of the cloth, but when you pull the fabric off the loom and turn it over, you will see a row of warp floats on the back
To fix this kind of float, cut a piece of weft about twice as long as the width of your fabric. Using your needle, weave in the missing weft pick from one edge of the fabric to another, leaving a generous tail on either side. After weaving in the yarn, pull on both edges of the fabric to allow the yarn to better incorporate into the fabric
Pull each tail out about 4 picks from the edge, deconstruct it, and weave half of it back into the cloth, to the edge, then bring it around the selvedges, and back into the cloth an inch or two to secure. The little float created at the selvedge will be less visible when using the same colored weft yarn.

A lot of flourish can go into finishing. It is often a step we put off, but with a little know-how up your sleeve it is an enjoyable part of the process. This little bit of extra time we get to spend with our cloth helps us better understand how the interlacement of weaving works.
Smitten by small looms and big plans, most of my weaving life is focused on creating know-how for the rigid-heddle weaver including collaborating with Gist to create the PlayBox series. I host Yarnworker, a site for rigid-heddle know-how and inspirations and its companion learning space Yarnworker School. From my home in central New Mexico, I weave, write about weaving, and dream-up, film, edit, and host the weave-alongs and classes. This space is supported by an amazing Patreon community who make all the weaves possible.